
Add Service Provider & Network Domain Data to GA4
"Service Provider" not set
Back in 2020, Google Analytics removed two of my most beloved dimensions: Service Provider and Network Domain. I loved these dimensions so much that I dedicated my first Taylored Data blog post to them. I used them to block bot traffic, to conduct lead generation, and conduct competitor research—losing these dimensions was absolutely devastating.
If you never got the chance to play around with this data before February 2020, here’s a snapshot from Universal Analytics (forever in our hearts 🕊️). You’ll see that I filtered the Service Provider dimension to only show me hits from Microsoft corporate ISP and added Region as a second dimension.
How to Add Service Provider and Network Domain to GA4
Warning⚠️: This blog is for educational purposes only. Consult with your legal/privacy advisors before adding this information into your Google Analytics account.
My preferred way of implementing Google Analytics is with Google Tag Manager because it gives me a lot of flexibility and allows me to tag the same components of my website for different martech (analytics, pixels, ads, social media, etc.) which saves me a lot of time.
We can use Google Tag Manager to capture the service provider and network data from website visitors by calling an IP address API and send the data to Google Analytics. There are several to choose from including:
These APIs return a JSON object with information about an IP address. Here’s a preview of what the object may look like:
-
{
"ip": "52.46.64.223",
"rir": "ARIN",
"is_bogon": false,
"is_mobile": false,
"is_satellite": false,
"is_crawler": false,
"is_datacenter": true,
"is_tor": false,
"is_proxy": false,
"is_vpn": true,
"is_abuser": false,
"datacenter": {
"datacenter": "amazonaws.com",
"network": "52.46.64.0/19",
"country": "FR",
"region": "FR-75C",
"city": "Paris"
},
"company": {
"name": "Amazon Technologies Inc.",
"abuser_score": "0.0006 (Low)",
"domain": "aws.amazon.com",
"type": "hosting",
"network": "52.0.0.0 - 52.79.255.255",
"whois": "https://api.ipapi.is/?whois=52.0.0.0"
},
"abuse": {
"name": "Amazon Technologies Inc.",
"address": "410 Terry Ave N., Seattle, WA, 98109, US",
"email": "trustandsafety@support.aws.com",
"phone": "+1-206-555-0000"
},
"asn": {
"asn": 16509,
"abuser_score": "0.0001 (Very Low)",
"route": "52.46.64.0/20",
"descr": "AMAZON-02, US",
"country": "us",
"active": true,
"org": "Amazon.com, Inc.",
"domain": "amazon.com",
"abuse": "abuse@amazonaws.com",
"type": "business",
"created": "2000-05-04",
"updated": "2012-03-02",
"rir": "ARIN",
"whois": "https://api.ipapi.is/?whois=AS16509"
},
"location": {
"is_eu_member": true,
"calling_code": "33",
"currency_code": "EUR",
"continent": "EU",
"country": "France",
"country_code": "FR",
"state": "Île-de-France",
"city": "Paris",
"latitude": 48.85341,
"longitude": 2.3488,
"zip": "75998 CEDEX 14",
"timezone": "Europe/Paris",
"local_time": "2025-04-11T17:33:18+02:00",
"local_time_unix": 1744385598,
"is_dst": true
},
"elapsed_ms": 0.65
}
Create a Custom HTML Tag in Google Tag Manager for the API Call
Once you’ve figured out which API you’d like to use, you’ll need to create a custom HTML tag in GTM. You can use my script as a guide for your own code. You’ll need to change the API endpoint to the correct one for your API and configure the variables to match the naming conventions you use in GTM.
Here’s how to find the Custom HTML tag type in Google Tag Manager:

How the Custom HTML Tag Works
Here’s a breakdown of what the code is doing:
First, I have an optional variable, tagSource with the value of my GTM tag’s name. I’ll add it as a new dimension to help me debug unexpected data (errors) in my GA4 reports.
An optional function, pushScriptError, that will push information to the data layer if an error occurs with this script.
The setIpCookie function sets a session cookie (that expires when a user closes the browser window, unless their browser is set to reopen any closed browser sessions). I’m setting this cookie because I don’t want to send unnecessary calls to the API each time a user’s page loads.
The getIpLookUpCookieValue function checks if the IP cookie exists and returns the cookie value (a stringified IP object) or null, if the cookie isn’t set.
I check to see if the cookieValue exists by running the getIpLookUpCookieValue function.
If cookie exists, I parse the cookie value and push it to the data layer.
If there’s an error with the script, I have a catch() that will send the error information to the data layer along with the tag name variable I mentioned in Step 1 for easier debugging in GA4.
I have the data layer event set as ‘ipLookupCookie’ to differentiate when the data layer is using the value from the API response or the stored cookie value.
If cookie does NOT exist, I fetch the data by calling the API, parse the response, set the response as a string and set that string as the cookie value (because cookie's only accept text as a value), and push the response object to the data layer.
If there’s an error with the API response, I have a catch() that will send the error information to the data layer along with the tag name variable I mentioned in Step 1 for easier debugging in GA4.
I have the data layer event set as ‘ipLookupAPI’ to differentiate when the data layer is using the value from the API response or the stored cookie value.
How to Set Up GA4 ISP Events Using Google Tag Manager
In this section, I’ll guide you through setting up new tags, triggers, and variables to send your Service Provider and Network Domain data to GA4.
View this blog for how to set up GTM if you don’t have an account already.
How to Implement the GA4 IP Event Tag

GA4 IP Event Tag Configuration:
Tag Type: Google Analytics: GA4 Event
Event Name: {{Event}} - this will push the same event name that's in the data layer to your GA4 property
Event Parameters: Use the Google Tag: Event Settings variable since you’ll want all of your general event parameters to be available for this event
💡Not sure how to set up GA4 event parameters in Google Tag Manager? Scroll down to this section for instructions.

Trigger Type: Custom Event name: ipLookupCookie|ipLookupAPI
Check "Use regex matching"
💡These are the event names for each IP lookup event that I specified in my code. Change the data layer event names to whatever works best for you.
How to set up the GA4 event parameters in GTM
Create user-defined data layer variables (DLV) for any custom data layer variable you intend to utilize in a GTM tag. Think of them as extra information you can add to each event. This lets you analyze your data in more specific ways.
You will need to create DLVs for each custom data layer variable that you would like to use in a GTM tag (that isn’t a part of the expected event payload).
For example, '“click ID” is a default data layer variable that the GA4 tag is expecting so we don’t need to create a DLV for it. On the other hand, GA4 isn’t expecting an IP address, so you’d need to create a new DLV for it to be passed to GA4.
GA4 Ecommerce Data Layer Variable Configuration:
Variable Type: Data Layer Variable
Data Layer Variable Name: {{variable}}
This is the name of the data layer variable we want GTM to read from. You’ll want it to match the exact JS variable name or key that is pushed to your data layer. In other words, when you look at your data layer, the variable name is in place of the bolded var in this example: dataLayer.push({'var': 'value'}).
In my code, I’m pushing ipInfo as a property of the object I send to the data layer. That means the entire IP response object will be available under ipInfo, and I can access any of its properties using dot notation—for example, ipInfo.city or ipInfo.country_name.
If you are using the same IP address API as me, here are some properties you may want to create variables for in GTM:
ipInfo.company.domain: captures the the user’s ISP Network Domain.
ipInfo.company.name: captures the the user’s Service Provider name.
ipInfo.is_vpn: a boolean for if the user’s IP is from a VPN or not.
ipInfo.vpn.url: captures the the user’s VPN Network Domain.
ipInfo.vpn.service: captures the the user’s VPN provider name.
Data Layer Version: Version 2 (I just leave it on the default setting)
Name and save each variable.
💡Note: For each DLV, you will need to create a custom dimension for it in the GA4 UI.
GA4 Ecommerce JavaScript Variable Configuration:
Variable Type: Custom JavaScript Variable
I also concatenate some of these variables since it’s likely that I’ll want/need to see both dimensions at the same time, like the company name and domain or VPN name and domain. This is totally optional, but this is how you’d set that up:
function() {
  var ipVpnService = {{DLV - ipInfo.vpn.service}};
  var ipVpnUrl = {{DLV - ipInfo.vpn.url}};

  if (ipVpnService == null && ipVpnUrl == null) {
    return null;
  } else if (ipVpnService == null) {
    return ipVpnUrl;
  } else if (ipVpnUrl == null) {
    return ipVpnService;
  } else {
    return ipVpnService + "-" + ipVpnUrl;
  }
}
I add these concatenated JS variables to my Google Tag settings variable instead of the single value DLVs, but you can send both versions to GA4 if you’d like.

How to set up GA4 Ecommerce Custom Dimensions
In order to analyze the Service Provider and Network domain information in GA4, you’ll need to create custom dimensions for those event parameters within the GA4 interface.
Go to your GA4 property and click on Admin
Under Property Settings, navigate to Data display, and click on Custom definitions
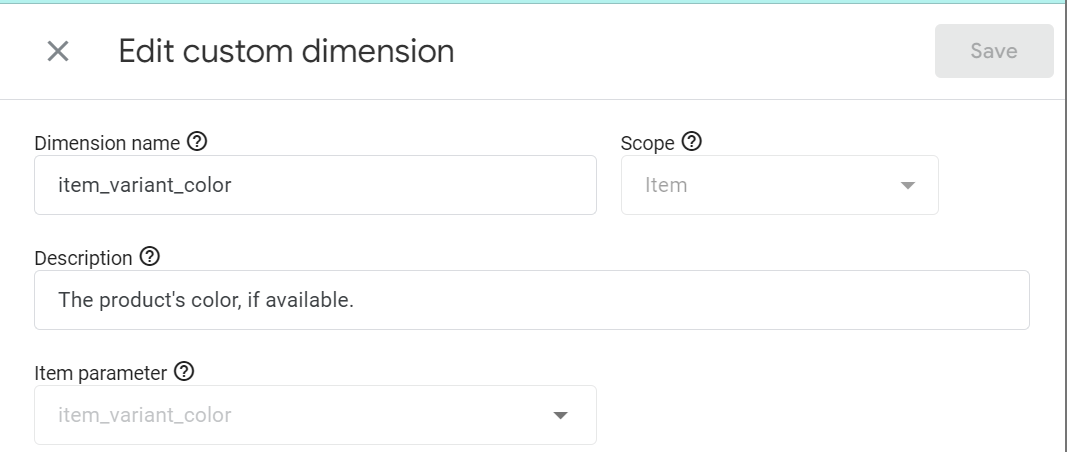
Click on create custom dimension
Dimension name: I tend to keep it the same as the DLV name, so I just copy and paste that here
Scope: Event
Event parameter: paste the DLV name here
Here’s an example of the custom dimension pane in GA4:
Test and Publish Your GTM Tags
Before publishing your new GA4 IP event tags, it’s important to test that the API call is going out as expected and that the tag is capturing accurate data to GA4.
You can use Google Tag Manager's preview mode to accomplish this. Preview mode enables real-time testing, allowing you to simulate user interactions and verify your tag is firing. Learn how to use Google Tag Manager’s preview mode here.
While you’re in preview mode, view your test data by using the Debug View in Google Analytics 4. The Debug View is similar to the Real Time Reports in Universal Analytics as it shows a real-time diagnostic interface to inspect data as it flows into GA4, except that it only shows data from users who are using the preview mode version of GTM.
This feature provides immediate visibility into incoming data, allowing you to quickly spot tracking issues or discrepancies without waiting the 24 -48 hours it takes GA4 to populate data into reports.
Once you’re confident that the data is accurately flowing into your GA4 ecommerce reports, hit publish to make your tags live.
Analyze Your Service Provider Data in Google Analytics 4
Here’s an example of how to use this data from my first blog post about the service provider dimension in 2019. The screenshots are from UA, but the principals still apply—just use your new ISP dimensions.
Let’s pretend that I’m a Googler who’s heard some buzzing in the office that Microsoft wants to bring back their Scroogled merchandise. I want to know what Google Merchandise Store products they’re most interested in, so that I can anticipate what types of products they’ll come out with so I can anticipate what kinds of products my coworkers and I will buy this time.

Know Your Competitors
I learned a lot during my time on the agency side, the most surprising because I was fresh out of college? That a lot of companies don’t have a clear picture of their competitors, so it’s important that you do some preliminary research to define yours.
Not sure where to start? Here are some high-level things I’d do:
Ask your customers/boss. Depending on your business, you can take this a step further and ask lost leads who they have decided to go with instead.
Keyword research.Use a keyword search tool or Google to learn what companies appear in the search results for your product/service keywords.
Google Trends. Enter a relevant keyword to your business and see what appears. Play with the location to narrow the search and check out the related queries section to see what other keywords those users searched for.
Identify Your Competitor in Your Google Analytics Data
Now that you’ve identified a competitor you want to analyze, you need to find them in the data. Head to the Network Report from the Technology Report category in the side menu or by using the menu’s search functionality for “network”.

Now that you have the Network report open, search for the company you’re interested in analyzing. At this point, you can also use a secondary dimension like location to make sure you are looking at the right company. Washington, New York and California are Microsoft hubs, so i feel safe assuming this is largely employee traffic.
Additionally, play with the date range to understand how long the users have engaged with your site (for this example, I went back to January 1, 2017).
Other data points to explore:
Day of week and hour of day: Are you in a 9-5 industry, but seeing a ton of weekend traffic? It may not be your competitor. Additionally, keep in mind that your GA data is based on your local time, so keep this in mind if your competitor is in another timezone.
Search terms: Find out what terms they were looking for on your site. This can tell you a ton about their intent.
Source/Medium: Are they using up your marketing budget clicking on your paid ads?
I love to dig into the data, so I created a segment to give me more flexibility to jump in and out of reports and to save me from having to search through the Network report to find these users later. If you’ve never created a segment before, it’s very simple and Google Analytics has great documentation on creating segments.
Here is the segment I created for Microsoft users in Redmond, WA (their headquarters):

Conditions
Service Provider: “microsoft corporation”
City: “Redmond”
Region: “Washington”
Now to the Good Stuff
Knowing what products and content users are viewing on your site is the most important data to provide stakeholders, and it’s no different when doing competitor research.
If you are an ecommerce business, add the segment you created and take a look at the Ecommerce reports to see if your competitors have purchased any products. In my example, I can see that Microsoft employees bought 13 t-shirts on October 3, 2018.

But I’m assuming that most competitors are not buying products our website, so we’ll want to look at the things like product views and top pages to discover what they’re most interested in on our website.


How to Send IP Info to GA4 from the Data Layer
If you’ve made it this far, you have hopefully been able to implement ISP data tracking through Google Tag Manager to see this data in Google Analytics.
As a summary, here’s a quick overview of the steps I covered in the blog:
1. Create a custom HTML tag in GTM to call the IP API
2. Create Data Layer Variables in GTM
In GTM, I create new Data Layer Variables to pull the nested IP object properties. For example:
ipInfo.city→ saved asDLV - IP CityipInfo.region→ saved asDLV - IP RegionipInfo.country→ saved asDLV - IP Country
This allows GTM to access those specific pieces of data when the event is triggered.
3. Add Event Parameters to My GA4 Tag
Next, I update the GA4 Settings variable (and/or the specific GA4 event tag) to pass those variables along with the event. In the Event Parameters section, I map each variable:
city→{{DLV - IP City}}region→{{DLV - IP Region}}country→{{DLV - IP Country}}
These parameters are what GA4 will receive and store when the ipLookupAPI event fires.
4. To make these values available in reporting, I register them as Custom Dimensions:
In GA4 → Admin → Custom Definitions → Create Custom Dimension
I set the scope to
Event, and use the parameter names (city,region,country) exactly as they’re passed from GTM.
5. Test Everything in GTM Preview Mode + GA4 DebugView
Once everything is set up, I test it in GTM’s preview mode to make sure the event and data layer variables are firing as expected. I also check GA4’s DebugView to verify the ipLookupAPI event includes the correct parameters.
After that, GA4 will start collecting these values, and I can use them in Explorations or custom reports.
I hope you found this tutorial helpful and use these same principles to track all of the important data on your website. If you did find this helpful, please let me know in the comments so I know to continue creating this type of content. Have questions about the code? Let me know that too!
If you’d like me to set this up for you, book a discovery call to discuss my implementation services.